프로젝트 관련
Project 1 - [백엔드] 업무 이해
프로젝트 목표 Threads의 회원가입 기능, 로그인 기능, 게시글 기능을 파악하고 개발합니다. 프론트엔드는 위 기능들을 구현하기 위해, 회원가입 페이지, 로그인 페이지, 게시글 페이지를 개발합
pm-developer-justdoit.tistory.com
Project 1 - 월요일 가서 할 일 <To do list>
Timeline 월 - 프로젝트 초기세팅 완료 / erd 모델링 완료 / 회원가입,로그인, 게시글 시작 화 - 회원가입 /로그인 /게시글-목록 확인 / 게시글- 포스팅 수 - 회원가입, 로그인, 게시글-목록, 게시글-포
pm-developer-justdoit.tistory.com
00. 피그마 --> frontended (백엔드의 경우엔, 설명/텍스트만 확인하면 됨)
0. [백] 프로젝트 초기 세팅
- db mate설치
- dbmate up 명령어
dbmate 설치 / 사용 하기
dbmate를 이용하면 손쉽게 Database schema 를 생성 할 수 있고, schema 이력 관리를 할 수 있다.
velog.io
DBmate, MySQL
위코드 3주차 과정중, mySQL과 dbmate를 쓰면서 직접 사용했던 쿼리문과 커맨드를 정리하고 그 과정 자체를 이해해보고자 한다.dbamate new urMigrationName dbmate로 마이그레이션 파일 생성ex)dbmate new create_b
velog.io
- Health Check
Node.js 내 Health Check 설정 방법
이번에는 Node.js에서 Health Check 시스템을 어떻게 설정하는지에 대해서 살펴보겠습니다. 요즘은 대부분이 Node.js를 쓰고 있는만큼 프로젝트 관리를 위한 Health Check 시스템을 미리 잘 설정하는 것이
bhealth.kr
- ping-pong
Node JS로 Ping - Pong 구현하기
목표 : 사용자가 Ping이라는 data를 보내면 서버에서 pong이라는 respond를 보내기 const express = require('express') const app = express() const port = 3000 const bodyParser=require('body-parser') app.use(bodyParser.json()) app.use(body
korin-learning.tistory.com
-pull_request_template.md 상세하게 작성
- package.json ”script” 상 세부내역 수정
- .env 실제 런서버 구동이 올바르게 이루어지는 환경변수 작성
- 상기 .env 파일에 기반한 .env.sample 파일 작성
- app.js 파일 생성 및 내부에 필요 코드(패키지 require 문, Health Check 문 등) 작성
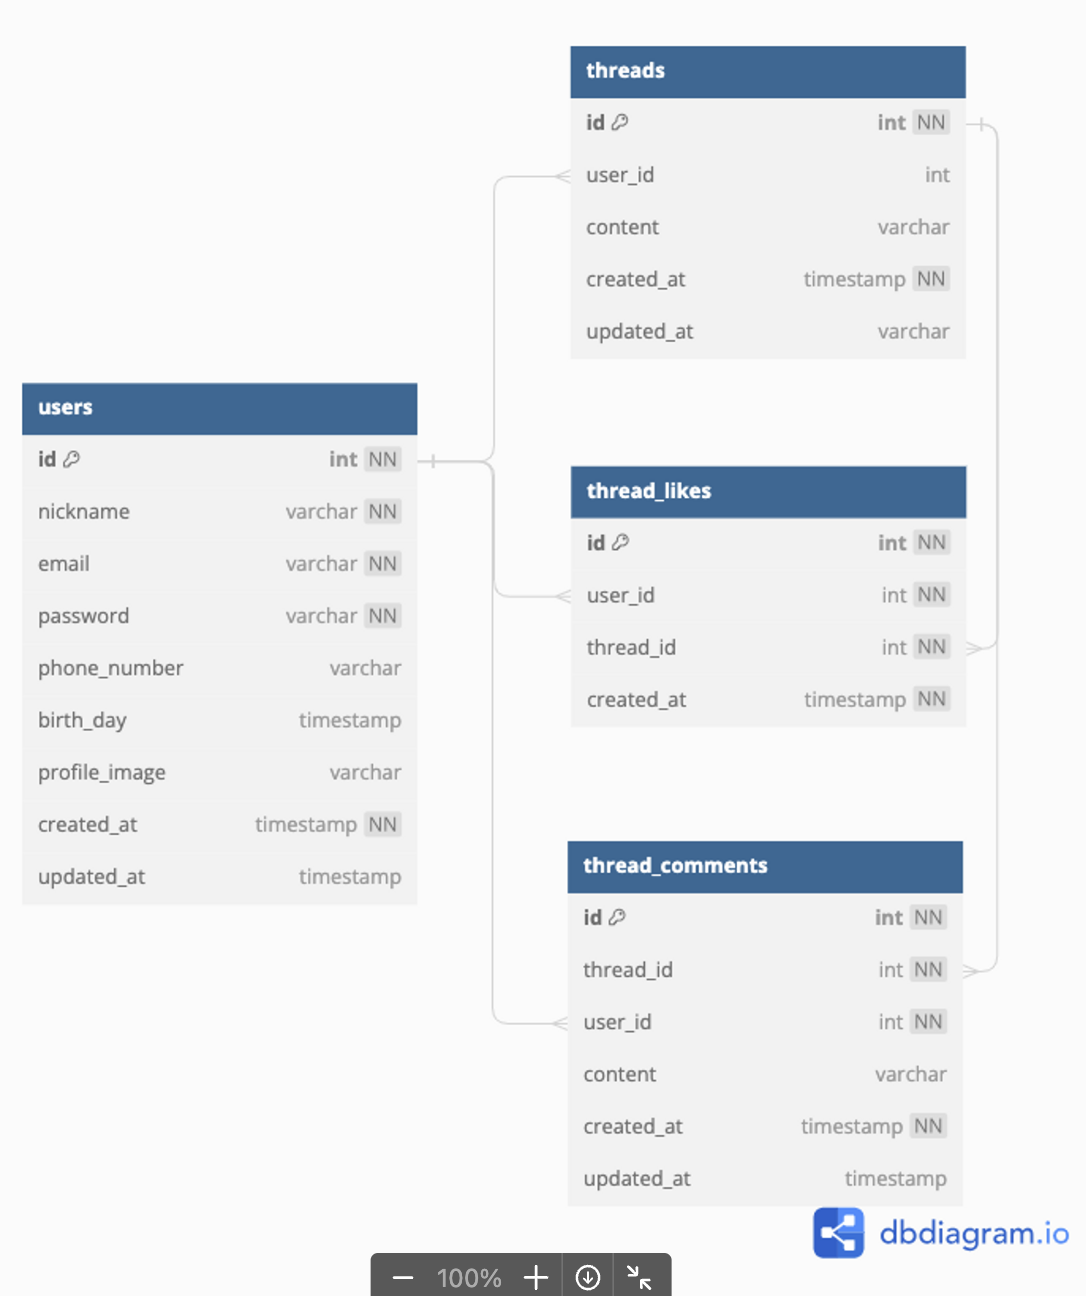
1. erd 모델링
- 그려보기
- 화살표 알기, 관계
DB ERD 모델링
모델링에 사용법에 대해서는 이전에 한번 적은적이 있다.https://velog.io/@ash3767/%EB%AA%A8%EB%8D%B8%EB%A7%81-Richard-Barker다시 정리하고 싶어서 또 적습니다. 참고자료 :https://yesdoing
velog.io
모델링 (Richard Barker)
바커 표기법(Baker Notation) 바커 표기법은 영국 컨설팅 회사 CACI 에 의해 처음 개발되었고 , 리차드 바커에 의해 지속으로 업그레이드 되었습니다. 엔터티(Entity) 엔터티는 기업에서 지속적으로 저
velog.io
[프로젝트 -> DB diagram best practice]
게시물 CRUD 좋아요 기능 등 (아직 진도 안 나간 부분 참고자료과제 )
[Westagram 만들기] 혼자 계속 공부하며 추가할 부분 **
westagram을 만들 건데 백엔드는 기능만 만드는 것. [백엔드가 넣을 기능들] Express를 이용한 API 서버 만들기 Express초기 환경세팅 (이미 했고) 회원가입/로그인 (이미했고) 게시글 등록 https://www.notion.
pm-developer-justdoit.tistory.com
[기능 구현]
1. 회원가입
(필수)email, password, nickname
회원가입 절차 코드
# 회원가입 mock data
**요청**
method: "POST"
body : JSON.stringify({
	email: "",
	password: "",
	nickname: ""
})

**응답**
예외처리
- email에는. 과 @ 이 필수 포함 / 정규식 참고 https://pm-developer-justdoit.tistory.com/79
- 비밀번호는 10자리 이상 필요
# 회원가입 (추가 구현 사항) phoneNumber, birthday(YYYY-MM-DD), profileImage
**요청**
method:"POST"
body : JSON.stringify({
	email:"",
	password:"",
	nickname:"",
	phoneNumber:"",
	birthday:"YYYY-MM-DD",
	profileImage:""
})

**응답**
2. 로그인 토큰 발급
(필수) email, password
근데 저게 왜 0번째인지 모르겠지만
#로그인 mock data
**요청**
method: "POST"
body: JSON.stringify({
	email: "",
	password: ""
})

**응답**
data : { accessToken: "JWT토큰" }
[게시물 Posts]
아래 링크 참고 [게시물 CRUD, like, 전체 조회, 유저 조회]
[Westagram 만들기] 혼자 계속 공부하며 추가할 부분 **
westagram을 만들 건데 백엔드는 기능만 만드는 것. [백엔드가 넣을 기능들] Express를 이용한 API 서버 만들기 Express초기 환경세팅 (이미 했고) 회원가입/로그인 (이미했고) 게시글 등록 https://www.notion.
pm-developer-justdoit.tistory.com
3. 게시글 목록 조회
- data (필수) nickname, content, createdAt, updatedAt
- 요구사항: 다른 사람들이 남긴 쓰레드들을 최신순으로 조회 --> 목록 조회 후, 그 객체/배열 정렬 문법 사용
- 예외처리 : 아무런 데이터가 없을 경우, 빈 배열을 반환
--> 최신 순 listing
app.get('/postings/recent', async (req, res) => {
try {
// Fetch all postings from the database and order them by creation date in descending order (most recent first)
const recentPostings = await postingRepository.find({
order: { createdAt: 'DESC' }, // Assuming 'createdAt' is the name of the column storing the creation date
});
res.status(200).json(recentPostings);
} catch (error) {
console.error('Error fetching recent postings:', error);
res.status(500).json({ error: 'Internal Server Error' });
}
});
#post list (mock data)
**요청**
method:"GET"
headers:{
  "Content-Type": `application/json`
}

**응답**
{
  data:[
    {
      postId : 1,
			nickname:"wecode",
      profileImage : "<https://~~~~~>",
      content : "일라이자 효과는 인간의 사고 과정과 감정을....",
      createdAt : "2023-08-16T~~~~"
    }
  ]
}
#3-1 post list (추가 구현 사항)
(선택) nickname, isMyPost, isLiked, likeCount, comments -->뭐지?
**요청**
method:"GET"
headers:{
  "Content-Type": `application/json`
	authorization:"토큰"
}

**응답**
{
  data:[
    {
      postId : 1,
      nicknamee : "wecode",
      profileImage : "<https://~~~~~>",
      isMyPost : false,
      content : "일라이자 효과는 인간의 사고 과정과 감정을....",
      isLiked : true,
      likeCount : 9,
      comments:[
        {
          commentId : 1,
          nickname : "lee",
          comment : "좋은 말씀이십니다.",
          isMyReply : true,
          createdAt : "2023-08-16T~~~~"
        }
      ],
      createdAt : "2023-08-16T~~~~"
    }
  ]
},
4. 포스팅
- Data- (필수) nickname, content, createdAt (선택) updatedAt
예외처리
- 로그인 하지 않은 사용자는 쓰레드 글을 남길 수 없습니다. --> 게시글 포스팅 api에서 로그인 토큰/ 회원 권한 부여
- content는 한 글자 이상/ 그렇지 않을 경우, CONTENT_TOO_SHORT 에러
--> 로그인한 사람만 글 쓸 수 있게
- User Authentication: Implement user authentication using a library like Passport.js or a custom authentication middleware. This typically involves creating user accounts, handling user logins, and generating and validating session tokens or JSON Web Tokens (JWTs).
- Middleware for Authentication: Create a middleware function that checks whether a user is authenticated before allowing them to create a posting. This middleware should be applied to the routes where you want to restrict access to authenticated users.
In this example, the ensureAuthenticated middleware checks for a valid JWT token in the request header and ensures that the user is authenticated. If the user is not authenticated, it returns a 401 (Unauthorized) response.javascriptCopy codeconst passport = require('passport'); // Middleware to check if a user is authenticated function ensureAuthenticated(req, res, next) { passport.authenticate('jwt', { session: false }, (err, user) => { if (err || !user) { return res.status(401).json({ error: 'Unauthorized' }); } req.user = user; return next(); })(req, res, next); } // Apply the middleware to your route app.post('/create-posting', ensureAuthenticated, async (req, res) => { // Only authenticated users can access this route const { title, content } = req.body; // Your posting creation logic here... });
- Here's an example of a simple authentication middleware using Passport.js and JWTs:
- User Registration and Login: Provide a mechanism for users to register accounts and log in. Upon successful login, issue a JWT or set a session to identify the authenticated user.
- For example, in a registration route, you might create a new user record in your database, and in a login route, you can validate the user's credentials and issue a JWT token.
- Protect Routes: Use the ensureAuthenticated middleware on routes where you want to restrict access to authenticated users. In your case, you applied it to the /create-posting route to ensure that only logged-in users can create postings.
- Logout: Implement a logout mechanism if needed, which typically involves destroying the user's session or invalidating their JWT token.
By following these steps and implementing user authentication and authorization, you can ensure that only authenticated users can create postings in your application. Users who are not logged in will receive a 401 response when trying to access the /create-posting route.
--> title, content 한 글자 이상
app.post('/create-posting', async (req, res) => {
const { title, content } = req.body;
// Check if the title and content contain at least one letter
if ( ! /[a-zA-Z]/.test(title) || ! /[a-zA-Z]/.test(content)) {
return res.status(400).json({ error: 'Title and content must contain at least one letter' });
}
try {
// Attempt to create a new posting
const newPosting = postingRepository.create({
title,
content,
});
await postingRepository.save(newPosting);
res.status(201).json({ message: 'Posting created successfully' });
} catch (error) {
console.error('Error creating posting:', error);
res.status(500).json({ error: 'Internal Server Error' });
}
});
create post / 생성
**요청**
method:"POST"
headers : {
	"Content-Type": "application/json",
  authorization:"토큰"
}
body : JSON.stringify({
  content:"유저가 작성 한 글"
})

**응답**
[Timeline]
월 - 프로젝트 초기세팅 완료 / erd 모델링 완료 / 회원가입,로그인, 게시글 시작
화 - 회원가입 /로그인 /게시글-목록 확인 / 게시글- 포스팅
수 - 회원가입, 로그인, 게시글-목록, 게시글-포스팅 완료 / 게시글-포스팅 수정/ 게시글- 포스팅 삭제
목 - 프론트와 서버 통신(1순위)/ (선택) 게시글 수정, 좋아요, 댓글
#5 update post
**요청**
method:"PUT"
headers:{
	"Content-Type": "application/json",
  authorization:"토큰"
}
body: JSON.stringify({
  content:"수정한 게시글의 내용"
})

**응답**
#6 delete post
**요청**
method:"DELETE"
headers:{
	"Content-Type": "application/json",
  authorization:"토큰"
}
body:JSON.stringify({
  postId: 1
})

**응답**
#7 post like 좋아요
**요청**
method:"POST"
headers:{
	"Content-Type": "application/json",
  authorization:"토큰"
}
body:JSON.stringify({
  postId: 1
})

**응답**
#8 create comment 댓글
**요청**
method:"POST"
headers:{
	"Content-Type": "application/json",
  authorization:"토큰"
}
body:JSON.stringify({
  postId: 1,
	comment:"사용자가 입력한 댓글 내용"
})

**응답**
VS code live share을 이용한 API 통신
- 상대 컴퓨터가 윈도우? 일 때 통신하는 컴퓨터 모두 다운 받아야 한다고
VS code live share extension을 사용하여 다른 컴퓨터에서 구동되고 있는 API를 호출
설치 가이드
https://www.notion.so/wecode/1-VS-Code-Live-Share-Guide-59a505ea7fd74df390f07cc562bcb231
🚩 우리 팀원의 서버에 접속하여 내가 원하는 메세지를 남기며 회원가입 진행
- 포스트맨 -> localhost:8000 에 회원가입 요청, 팀원의 서버에 가입
- 포스트맨 -> 동일한 서버에 로그인 요청, 팀원의 서버로부터 토큰을 받습니다.
- [선택, 심화 과제] (프론트에 회원가입 리액트 코드가 완료된 팀원이 있다면), 리액트 코드와 연동하여 회원가입/로그인을 완성
'Wecode - Project 1 (부트캠프) > Project 1 과정' 카테고리의 다른 글
| Project 1- 1일 차: Planning Meeting (0) | 2023.09.11 |
|---|---|
| Project 1- 1일 차: [백] 프로젝트 초기 세팅 (0) | 2023.09.10 |
| Project 1 - 0일 차: [백엔드] 업무 이해 (0) | 2023.09.10 |
| Project 1-0일 차: 진행에 앞서 ; MVP 이해와 업무협업 툴 이해 (Trello, Slack) (0) | 2023.09.10 |
| Project 1 - 0일차: 월요일 가서 할 일 <To do list> (1) | 2023.09.10 |